[FW]Accessing 32-bit DLLs from 64-bit code

Forward: Accessing 32-bit DLLs from 64-bit code

Migrating your 32-bit Windows application to a 64-bit machine can be problematic if you have 32-bit DLLs that you cannot re-write. Mike Becker shows you how you can access 32-bit DLLs from 64-bit code using built-in IPC mechanisms.

Originally published on DNJ Online, June 2007.

Microsoft’s 64-bit technology first appeared with Windows Server 2003 for Itanium 2 (also known as IA64 Architecture) and for eXtended technology CPUs (also known as x64 Architecture). It offers many advantages but also raises new issues for the software developer. For example, you may still need to access existing 32-bit DLLs from a 64-bit process.

A key advantage of 64-bit technology is its ability to address up to 8Tb of memory, against a maximum of 2Gb for 32-bit processes. As a result, 64-bit technology allows most data processing to take place in memory, without any need for temporary disk storage. This can considerably increase performance and open up new data processing scenarios. There are therefore good arguments for migrating current 32-bit software products to a 64-bit platform.

Many C or C++ applications are easy to migrated to a 64-bit platform, particularly if they are written in a monolithic fashion. Sometimes they just need to be rebuilt with an x64/IA64 compiler to run as native 64-bit applications. However distributed or module-based software can cause more problems.

The conflict: 64-bit versus 32-bit

A major migration issue concerns 32-bit software components which cannot be migrated, perhaps because the source code is lost or one of the dependencies cannot be migrated.

Your 32-bit software is still supported on a 64-bit platform as 32-bit processes can be executed inside the dedicated Windows on Windows’ (WOW64) subsystem which is part of all 64-bit Windows operating systems. However a 64-bit process cannot load a 32-bit module into its process space, and a 32-bit processes cannot load a 64-bit module into its process space. The only way that communication can happen between 32-bit and 64-bit modules is through interprocess communication (IPC). In other words, 32-bit and 64-bit processes can exchange data using IPC techniques such as out-of-process COM, sockets, Windows messages or memory mapped files.

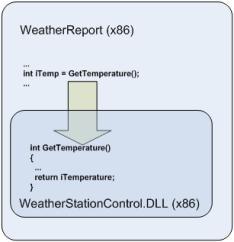
A 32-bit software product contains the main module WeatherReport which calls into the DLL WeatherStationControl. As long as both the main module and the DLL are 32-bit processes the product can run on both 32-bit and 64-bit platforms (inside WOW64). If both the main module and the DLL are migrated to the 64-bit platform, then they can both run in a native 64-bit process. However if only the main module is migrated to 64-bit, it will not be able to load the 32-bit DLL.

The best way to migrate such a product to a 64-bit platform is to migrate both the main module and the dependency DLL, but if the dependency DLL cannot be migrated then it cannot be loaded into the 64-bit process and the application won’t work.

The solution: a surrogate process

This issue can be solved by loading the dependency DLL into a separate 32-bit process space. The main module, running as a 64-bit process, can then access the dependency DLL across the process boundary using IPC (see MSDN reference).

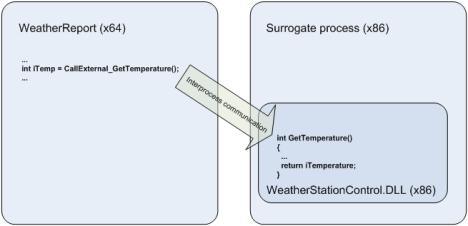
A 64-bit process can access a 32-bit DLL across a process boundary if the 32-bit DLL is loaded into a separate 32-bit surrogate process space, and the application makes use of the built-in IPC mechanisms that support data exchange between 32-bit and 64-bit processes.

This solution requires additional work as the 32-bit surrogate process that loads the 32-bit DLL and exposes its API must be created. Also, some changes will be necessary on the 64-bit side as the consumer must use one of the IPC techniques instead of directly accessing the 32-bit DLL. It is worth noting that, in extreme cases, this additional work could be comparable to the work involved in developing a 64-bit version of the 32-bit DLL from scratch.

One possible way of reducing these costs is to implement a 64-bit wrapper’ DLL that exposes the same functions, parameters, types and so forth as the original 32-bit DLL. This wrapper DLL can then make IPC-based calls to the original 32-bit DLL, which has been loaded into a surrogate process.

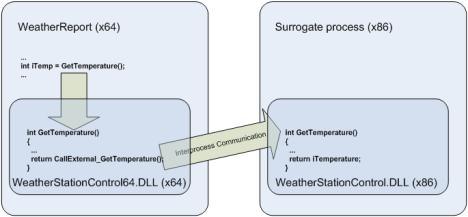
A 64-bit wrapper DLL (WeatherStationControl64.DLL) exports the same interface as the original 32-bit DLL (WeatherStationControl.DLL), so providing the same services to the main process (WeatherReport) without you needing to make any changes to the code of either the main process or the 32-bit DLL. This wrapper DLL delegates calls to the 32-bit DLL, which is running in a surrogate process, using IPC.

The main costs of this solution arise from implementing the surrogate process, loading the 32-bit DLL and implementing the 64-bit wrapper DLL. The actual cost depends on the IPC technique used to exchange data between the 64-bit and 32-bit processes.

COM as an IPC mechanism

One of most popular IPC techniques is DCOM (Distributed COM). Originally designed for distributed systems, DCOM is still supported on 64-bit Windows platforms, so both 32-bit and 64-bit COM modules can be built. The only limitation is that 64-bit and 32-bit modules cannot reside in the same process space, so they have to interoperate across process boundaries. This is done using out-of-process’ (OOP) COM components, in the following way:

  1. Create a 32-bit component implementing a COM object which loads and calls into the 32-bit DLL, and exposes the 32-bit DLL interface as a COM interface.
  2. Configure this COM components for OOP by either creating a standard COM+ OOP application (using dllhost as the surrogate process), or by implementing the COM component as a dedicated COM server process using, for example, an ATL COM server as hosting process or a Win32 service as a dedicated COM server.
  3. Create a 64-bit wrapper DLL which implements the same interface as the original 32-bit DLL, imports the COM interface of the COM object created above, translates current calls to the exposed interface into calls to the COM object interface, transfers the call parameters, receives return values and delegates them to the callers.

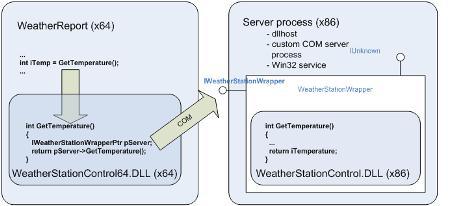
The 32-bit DLL (WeatherStationControl.DLL) is used by a COM object (WeatherStationWrapper) which exposes the interface of the 32-bit DLL as a COM interface. The 64-bit wrapper DLL (WeatherStationControl64.DLL) makes calls to this interface which are delegated to the original 32-bit DLL. The main process (WeatherReport) calls the interface exposed by the 64-bit wrapper DLL but is in fact served by the original 32-bit DLL.

This solution should be significantly less expensive than creating a 64-bit version of the 32-bit DLL from scratch. Microsoft’s ATL technology is supported by Visual Studio with wizards and ready-written code fragments which should also help lower migration costs by saving time and reducing the likelihood of errors.

Implications

There are, however, a number of things that you still need to keep in mind:

1. Alignment
The alignment of data in memory is different for 32-bit and 64-bit processes. This means that your more complicated custom data structures may be serialized by a 32-bit process in a way that is different to that expected by a 64-bit process, and vice versa. Microsoft Windows Platform SDK includes documentation about the differences in memory data alignment between 32-bit and 64-bit processes.

2. Data types
In most instances, 64-bit Windows uses the same data types as the 32-bit version. The differences are mainly in pointers which are 32 bits long in 32-bit Windows and 64 bits long in 64-bit Windows. The pointer-derived data types such as HANDLE and HWND are also different between 32-bit and 64-bit versions. Windows helps you to keep a single code base for both 32-bit and 64-bit software versions by offering polymorphic data types that have a different length depending on the target platform, for example INT_PTR declares an integer with the size of a pointer’. Any variable of this type is an integer which is 32 bits long on a 32-bit platform and 64 bits long on a 64-bit platform.

3. COM initialize
You can only access a COM object from a Windows application the object has been successfully initialized. The COM API function CoInitialize()must be called for each thread that is going to access a COM object before any COM interface calls are made, and the complementary call CoUninitialize() must be performed before the thread exits (see MSDN reference). This rule must be strictly respected if the main process calls to the original 32-bit DLL are multi-threaded.

4. Security
The OOP COM component instantiates COM objects in a separate process, whether a surrogate process, a COM server or Win32 service. This can mean that calls to the 32-bit DLL may happen in a different security context to the main process, especially if the main process makes intensive use of impersonation. If this is the case you may want to configure dedicated credentials for the OOP component, or implement internal impersonation in the COM object.

5. Performance
The IPC-based solution is almost certain to be slower than making direct calls into the DLL. Data marshaling over process boundaries, automatic data conversion between 32 and 64 bits, WOW64 features and delays while instantiating the COM object will all impact performance. However there are numerous optimizing techniques that you can use such as COM pooling, caching inside the wrapper DLL, chunky’ versus chatty’ calls over process boundaries, implementing performance critical interfaces directly in the 64-bit DLL, and so forth.

6. Redirection
The WOW64 subsystem is in charge of supporting 32-bit modules on 64-bit Windows. To avoid unwanted collisions between 32-bit and 64-bit software, particularly when accessing the file system and registry, WOW64 isolates 32-bit modules using a process called redirection’ (see MSDN reference). For example, for a 64-bit process the call to obtain the system folder pathname returns %WINDOWS%\System32, but for a 32-bit process it returns %WINDOWS%\SysWOW64. The program folder path for a 64-bit process is Program Files’, but for 32-bit process it is Program Files (x86)’. The registry key HKEY_LOCAL_MACHINE\Software contains 64-bit process settings and data, while the key HKEY_LOCAL_MACHINE\Software\WOW6432Node contains 32-bit process settings and data.

This redirection is activated automatically when software modules call to popular pre-defined system paths or registry keys.

7. Kernel modules
The solution proposed here is for 32-bit user level DLLs, and doesn’t work with 32-bit drivers. This is because 32-bit kernel modules cannot be used on a 64-bit platform, with no exceptions or workarounds. If your product includes any kernel level module, such as a device driver, then the only possible migration route is to re-write the kernel module as a 64-bit process.

8. Setup
Using a COM OOP component in place of direct calls to a DLL requires changes to your setup procedure as the COM components must be installed and registered by the system. As discussed under ‘Security’ above, this may involve configuring dedicated credentials for the COM component.

References

  1. Best Practices for WOW64
  2. MSDN on Interprocess Communications
  3. Introduction to Developing Applications for the 64-bit Itanium-based Version of Windows
  4. Understanding CoInitialize()

Git 命令

1. 删除远程分支

如果不再需要某个远程分支了,比如搞定了某个特性并把它合并进了远程的 master 分支(或任何其他存放稳定代码的分支),可以用这个非常无厘头的语法来删除它:git push [远程名] :[分支名]。如果想在服务器上删除 serverfix 分支,运行下面的命令:

$ git push origin :serverfix
To git@github.com:schacon/simplegit.git
 - [deleted]         serverfix

服务器上的分支没了。你最好特别留心这一页,因为你一定会用到那个命令,而且你很可能会忘掉它的语法。有种方便记忆这条命令的方法:记住我们不久前见过的 git push [远程名] [本地分支]:[远程分支] 语法,如果省略 [本地分支],那就等于是在说“在这里提取空白然后把它变成[远程分支]”。

Wrapper JNI Program Guide 4

Originally From Wrapping a C++ library with JNI Part 4

Wrapping a C++ library with JNI
- part 4

In this series…

  • Introduction, outlining the general steps from starting with a C++ library to being able to build and run simple tests on some JNI wrappers;
  • Part 1, in which I design some simple Java classes and generate the stub wrapper code;
  • Part 2, in which I add just enough of the implementation to be able to do a test build;
  • Part 3, discussing object lifecycles in C++ and Java;
  • Part 4, the final episode covering a few remaining points of interest.

A More Complex Method

The most complex function in our API is the process method in the Plugin class. In C++, this is

typedef std::vector<Feature> FeatureList;
typedef std::map<int, FeatureList> FeatureSet;

virtual FeatureSet process(const float *const *inputBuffers,
                           RealTime timestamp) = 0;

That is, the process method of a Plugin object takes a two-dimensional array of floats and a RealTime object as arguments, and returns a map from an integer to a FeatureList, which is a sequence of Feature objects stored in a vector. That’s fairly complicated.

Java lacks typedef or any very satisfactory alternative. So, we render this as

public native Map<Integer, ArrayList<Feature>>
    process(float[][] inputBuffers, RealTime timestamp);

where Feature and RealTime are classes we must provide separately. (It’s good form to declare the return type using an interface such as Map in cases where the caller doesn’t need to care which specific container implementation is used. In this case our concrete return type should probably be a TreeMap.)

I’m not going to explain every detail of the implementation of this in the JNI wrapper, but I want to illustrate a couple of aspects:

Constructing Java objects from JNI code

In this particular case, the objects we want to return take rather a lot of work to construct. However, we can illustrate a simple example. At the innermost level, all of our returned objects have type Feature, a Java class we define which has a constructor that needs no arguments.

To construct one of these, first we need to look up its class:

jclass featClass = env->FindClass("org/vamp_plugins/Feature");

Then we find the method in the class that corresponds to the constructor. The GetMethodID function is used for looking up all non-static methods, with the method name supplied as the first string argument. For a constructor, the method name is <init>. The final argument gives the signature of the method to look up; in this case ()V means a method taking no arguments with a void return type.

jmethodID ctor = env->GetMethodID(featClass, "<init>", "()V");

Then, to construct the object we simply call the constructor:

jobject feature = env->NewObject(featClass, ctor);

Handling Generics through JNI

This is dead easy. Generic types are there only for the purpose of compiler type-checking: they don’t exist in the virtual machine or in the .class file. In terms of Java objects, including from the perspective of any JNI code, our ArrayList is simply ArrayList. So, to construct the TreeMap<Integer, ArrayList<Feature>> we intend to return from our function, we only need to do this:

jclass treeMapClass = env->FindClass("java/util/TreeMap");
jmethodID treeMapCtor = env->GetMethodID(treeMapClass, "<init>", "()V");
jobject map = env->NewObject(treeMapClass, treeMapCtor);

Of course we then need to make sure the objects we put in it are of the right type, as the Java compiler is no longer there to help us with type-checking.

Similarly, if a generic container gets passed to a native function, we can (and must) just ignore the type specialisation when unpacking it.

Getting Data from Multi-Dimensional Arrays

My process function takes a two-dimensional array of floats as one of its arguments. (This actually represents multi-channel audio sample data.)

Multi-dimensional arrays in Java are easier to deal with reliably than in C++. An array is an object, so a two-dimensional array is an array of array objects. It appears in the JNI implementation as a jobjectArray:

jobject
Java_org_vamp_1plugins_Plugin_process
    (JNIEnv *env, jobject obj,
     jobjectArray inputBuffers, jobject timestamp);

JNI provides simple accessor methods for getting at array elements: to pull out an object from an array of objects, we use GetObjectArrayElement. That will enable us to get hold of the second dimension of our arrays.

Then, to access a sequence of non-object type elements such as our float values all at once, we need to use a symmetrical pair of calls: one to lock the elements in place so the garbage collector can’t get at them, and the other to release them again. To wit, GetFloatArrayElements and ReleaseFloatArrayElements.

Putting these together to retrieve our two-dimensional float array in C++, we have as the body of our process function:

int channels = env->GetArrayLength(data);
float **input = new float *[channels];

for (int c = 0; c < channels; ++c) {
    jfloatArray cdata =
        (jfloatArray)env->GetObjectArrayElement(data, c);
    input[c] = env->GetFloatArrayElements(cdata, 0);
}

Then we do something with the C array that is now stored in input, hang on to the output for a moment, and tidy up:

for (int c = 0; c < channels; ++c) {
    jfloatArray cdata =
        (jfloatArray)env->GetObjectArrayElement(data, c);
    env->ReleaseFloatArrayElements(cdata, input[c], 0);
}

delete[] input;

and we’re done. It remains only to construct and return our rather complex return value based on whatever we calculated with the input array earlier.

That’s all

That’s all for this series—thanks for reading, and I hope it’s been useful.

Wrapper JNI Program Guide 3

Originally From Wrapping a C++ library with JNI Part 3

Wrapping a C++ library with JNI
- part 3

In this series…

  • Introduction, outlining the general steps from starting with a C++ library to being able to build and run simple tests on some JNI wrappers;
  • Part 1, in which I design some simple Java classes and generate the stub wrapper code;
  • Part 2, in which I add just enough of the implementation to be able to do a test build;
  • Part 3, discussing object lifecycles in C++ and Java;
  • Part 4, the final episode covering a few remaining points of interest.

My previous post on this topic ended with a very simple test program built and run successfully, wrapping a small subset of the C++ library I was referring to.

That’s all I want to go through step-by-step, but there are still a couple more things to explain. The first one is…

Disposing of C++ objects

Java objects are garbage-collected: you don’t have to delete them when you’ve finished with them.

C++ objects are not. Unless they’re locally scoped objects allocated on the stack (i.e. created without a call to new), you have to delete them explicitly when you’ve finished with them, or else you’re creating a resource leak.

The wrapper code I’ve been describing uses Java objects that “own” their corresponding C++ objects. My Plugin object for example contains an opaque nativeObject handle which, on the C++ side, gets interpreted as a pointer to the C++ object that provides the plugin implementation. This object belongs to the Java Plugin wrapper, and it should have a corresponding lifetime which we need to manage. Nothing else is going to delete it if we forget to.

This means we need the Java object to delete its C++ object when it is itself deleted. But a Java object isn’t deleted explicitly, and it has no C+±style destructor function we could make this happen from.

We have two options:

  1. Add a method to the Java class that deletes the C++ object, and insist that users of our library remember to call it;
  2. Delete the C++ object from the Java class’s finalize method, which is called by the JVM when the Java object is garbage collected.

The second option, using finalize, is attractive because it reduces the burden on our users. Deleting the object would be automatic. If we take the first option, any method we add to delete our object will be one that isn’t required for most Java classes, and that also doesn’t exist in the same form in the C++ library we’re wrapping—so developers coming from either Java or C++ will quite likely overlook it.

But there are several problems with using finalize for this.

One problem is that, because the JVM only controls memory and resources within the Java heap, it can’t take into account any resources allocated in the native layer when determining which Java objects it needs to garbage-collect: our Java objects will seem smaller than they effectively are. So it might not finalize our objects quickly enough to prevent memory pressure.

A second problem is that we can’t guarantee which thread the finalize method will be called from. It’s quite important that our C++ object is deleted from the same thread that allocated it.

Finally, it’s possible that the C++ library we are wrapping might expect objects to be deleted in some particular order relative to one another, and we can’t enforce that if we leave the garbage collector to do it. When in C++, we should do as C++ programmers do.

And that means we need to get the user of our library to tell us when to delete objects: we must at least take our option 1. That is, we add a method called dispose to the Java class: when it’s called, it deletes the underlying native object. But, of course, our user—the programmer writing to our library—must remember to call it.

(Why “dispose”? Well, it’s a good name, and it’s the name used by some other libraries that rely on native code, such as the SWT widget toolkit.)

In our Plugin class, the dispose call would be simply

public native void dispose();

and the implementation in Plugin.cpp, using the native handle helper method referred to in my earlier post, would be along the lines of

void
Java_org_vamp_1plugins_Plugin_dispose(JNIEnv *env, jobject obj)
{
    Plugin *p = getHandle(env, obj);
    setHandle(env, obj, 0);
    delete p;
}

In principle we could also make the finalize method call dispose in case the user forgets. But that’s probably unwise, as the library’s behaviour could become quite unpredictable in subtle ways if the pattern and order of deallocations depended on whether the user had remembered to dispose an object or had left it to the garbage collector.

Another possibility might be to test within finalize whether the object has been disposed, and print a warning to System.err if it hadn’t.

Coming next

In my next (and final) post on this subject, I’ll give an illustration of a function with rather more complex argument and return types than the ones we’ve seen so far.